Pages

Wednesday, February 27, 2013

What If? Wednesday Designer's Choice Challenge

Good morning!  I hope your week is coming along.  I have been really busy lately and I am loving it.  My new job has recently gone from part time to full time where I am working 6 days a week.  But I am seriously not complaining at all, I truly love my job and all the opportunities it brings to me.  This is just what I needed for myself and my family.  

But let's talk about this amazing Designer's Choice Challenge we have today.  This one comes from Rock Star Cheri and she has challenged us to create a card using only the colors Black, Red and White.  I really enjoyed this challenge and I am thrilled with what I came up with. 


The white card base measures 5 x 4 3/4 , the black card stock layered on top of that measures 4 3/4 x 4 1/2 and the white layer on top measures 4 1/2 x 3 1/2.
I placed some black beaded thread on the top and bottom portion of the card, used a red flower bud and the sentiment comes from Repeat Impressions and is called "My Best Bud" (3919-F).  

You have until March 13th to upload your Black, Red and White card to the Repeat Impressions blog.  You do not have to use a Repeat Impressions stamp, but if you do you will get an added bonus of an extra entry!  I cannot wait to see what you create this week!

If you need some more inspiration take a look at what my fellow Rock Stars made
Deonna Bemish


Thank you so much for stopping by.  I hope the rest of your week is wonderful and full of creative possibilities!
Photobucket

Monday, February 25, 2013

Repeat Impressions Stamp of the Week!!!

Good morning!  Welcome to a brand new week full of  creativity and inspiration. 
Today for the Stamp of the Week from Repeat Impressions we highlight the stamp "Today is a Gift" (3113-H)


What a lovely sentiment this is.  Here is the card I created using this stamp...


This card measures 5 1/2 x 4 1/2, I used glossy paper and alcohol inks to create this background.
I then used some black card stock to mat my glossy paper and adhered them to a white base.
I used VeraMark ink and some black embossing powder with a heat tool to create the raised sentiment.
I then placed a Maya Roads butterfly on some foam adhesive for a little extra touch.

I do hope you visit the other Rock Stars and see what they have created using this stamp.


This stamp is available to our blog readers this week only February 25-March 3, 2013 for 50% off. (limit one please).  Go to the Repeat Impressions blog to click on the link to order and put in the coupon code SOTW225.

I hope you have a wonderful day, take care and remember to come back Wednesday for another What If? Wednesday.
Photobucket

Wednesday, February 20, 2013

What If? Wednesday - Sketch Challenge

Good morning my crafty friends and welcome to another What If? Wednesday.  We have another great sketch from Wendy to work with.
I created two cards with this sketch.  

The first card is a sympathy card using Repeat Impressions stamp Becomes a treasure (4017-H).  I heat embossed the sentiment onto pink card stock.  The floral patterned paper is from This & That collection from Echo Park and the green paper is from the Neapolitan collection from American Crafts Dear Lizzy.
The second card I used the Daffodils stamp (904-L) from Repeat Impressions.  I used chalk on this particular stamp and the outside area around it.  I then used Spica pen to add some sparkly enhancements to the flowers and leaves.  The camera didn't pick that up to well but it really does look great.  The paper I used on this card is from Basic Gray.

Repeat Impressions is accepting submissions for this sketch challenge until March 5th.  Simply upload your creation to your blog or Splitcoast gallery and link it the Repeat Impressions blog for your chance to win a $25 Repeat Impression gift certificate.

Here are some of the other Rock Stars creations to help inspire you
Deonna Bemish

Thank you so much for stopping by today!  I hope you have a wonderful day, take care and create something beautiful!

Photobucket

Wednesday, February 13, 2013

My Craft Room 90% Complete

Hello again friends!!!  I know I've already shared pictures of my craft room but now there is more to show!  This past Friday Eric took me out to dinner (Red Lobster) Yummy and was talking about how we had to stop someplace to get some screws for a "special" project that he needed my help with.  I was curious but waited patiently through dinner and our trip to the hardware store. We returned home and here the sneaky sweetheart of a man had already been to Ikea earlier in the afternoon when I was at work. Sooo here is the finished room however I took these pictures in the middle of the night and so I wasn't able to vacuum the floor before I snapped them.  I was to anxious to share these with everyone.  I still have the walls to decorate but other than that is it pretty much done.
The pictures are taken from the door and then taken as if you were turning from left to right around the room.
This is the door shut with my organizing wall hanger/craft aprons to the right is my little organizer drawer unit and one of the desks from Ikea with printer on it and another organizing drawer unit below.
Left of the door there is a black wire shelving unit turned to face the other way.  What we have done here is to turn my Michael's white paper organizers to face the side.  On the top unit I have my patterned paper that is lose, below that the other unit has all my card stock.  On top of the wire shelf I have a file bin that has some files and papers.
Eric thought it would be neat to have these nifty hangers to hold all my Cricut mats.  They work out nicely.
Here is the front side of the black wire shelving unit.  You can see better here how the white units are displayed.  In the two facing the front here are more patterned papers that are lose and a few 12 x 12 patterned paper books.  I also have in the big pink bag on top all my ribbon.  I have a few extra paper trimmers on the bottom shelf and my Cricut tote bag on top shelf.
This is what is directly opposite the wire shelf.  In the two purple drawer units are all my stamps along with the tote in the middle on top.  The white drawer unit has my stickers, bags, and memorabilia in it along with some odds and ends.
Here is a wider shot of the area you just saw.  
These are my white organizing units on black wire shelving.  These hold more paper, paint, some magazines, embellishments of all sorts, stickles, adhesives, 6x6 paper pads, and lots more!
Here is a long shot of the other desks in here.  They hold my two Cricuts, Big Shot, Texture Boutique, camera, Copics, two more small white organizer units and more!  There are some totes underneath these desks too.
Here is a shot in front of the desks. One of my kitties is snoozing underneath.
Here is where the U-shape comes together.  You can see that we used two corner desks and two regular sized desks and put them together connecting them in the middle is a smaller sized wooden organizer.  Holding my Recollections spinning tower.
And back to the beginning.  You will have my computer and some files and such.  The organizing drawer unit under the desk here holds all my inks and acrylic blocks, work stuff and some misc card making supplies.

I hope you like what I have done so far and that it possibly inspires you.  I'd love any suggestions you may have or ideas on how to decorate the walls.  I have a big bulletin board that I want to hang but I am not sure where to place it.  I want it to all look nice.  Eventually the plastic organizing units on the floor are going to be replaced with something nice from Ikea to match better.  Just cannot do all that at one time.

Thanks for stopping by, take care and please take some time today to create something wonderful for yourself or the one you love!


Photobucket

What If? Wednesday Designer Choice Challenge

Welcome everyone to another What If? Wednesday!!!  Today we have a Designer Choice Challenge from Kecia and she would like us to create a card using our all time favorite Repeat Impressions stamp(s).  I know there are so many great stamps from Repeat Impressions that it may be hard to choose but that is why it's called a challenge.

I decided to use two stamps; the one on the outside of the card is called Sun Beams (4525-K) and the sentiment on the inside is called Moms like you... (4020-G).

The card measures 5x5
I used Spellbinders Nestabilities Standard Circles (lg) to make my center in the yellow card stock, then embossed it with my Sizzix Big Shot.  
The Sun Beams stamp from Repeat Impressions was created using Memento Ink colors: Bahama Blue, Tangelo and Cantaloupe and Copic markers B00, Y38 and Y06.  
I hope you are inspired to create a card using your favorite Repeat Impressions stamp also.  Take a look at what my fellow Rock Stars have created using their favorite Repeat Impressions stamp(s).

Deonna Bemish

Thank you so much for stopping by today and taking part in today's What If? Wednesday.  Take care and try to do something crafty today!
Photobucket

Monday, February 11, 2013

Repeat Impressions SOTW - Scruffy Puppy

Good morning everyone!  We have got another great Stamp of the Week from Repeat Impressions to share with you.  
This adorable stamp is called 
Scruffy Puppy (8120-K)
Isn't he cute?!
I want to show you what I did using this stamp...


The sentiment here is also a Repeat Impressions stamp called 
Dogs Laugh (8115-F). 
I colored in my little guy using Copics E31, E35 and R32.  The paper is Moxxie from the Surprise Party collection.  

This stamp is available exclusively to Repeat Impressions blog readers at 50% off from February 11-17, 2013 only. Limit to 1 per person.  So head over to Repeat Impressions and grab your discount code so that you can get this adorable stamp sent to you!

Need more inspiration? Then check out the other Rock Stars creations:

Thank you so much for stopping by today and I hope you are inspired to create something beautiful!  Take care...
Photobucket

Thursday, February 7, 2013

Some New Cards To Share!!!

Good morning everyone!  I have one thing to say...The Flu STINKS!!!

Okay so now you know why I've been away so lets get to the good stuff!
I have some cards here that I made a while ago and meant to post so I say better late than never.

This first one is a Get Well card using a couple of Repeat Impressions stamps


The stamps are Tea Pot (4517-F) and If What I am Wishing (1903-1).  I took the Tea Pot stamp and used three different colors that I though went well; they are Memento Inks - Lilac Posies, Danube Blue and Grape Jelly. 
The little heart patch is from Simple Stories; it's a self-adhesive piece of fabric.

This next card was created using another Repeat Impressions stamp called Sunbeams (4525-K)

What I did here was used some markers on the image.  I simply colored in the different areas of the stamp with a few different colors and did the magical "huff" onto the stamp then pressed my image onto the card stock.  I used some black Glaze around the outer circle as you can see a little better in the bottom picture.

Next I have a slider card for you.  Created with Repeat Impressions stamps.


The stamps used are called Tumbling Hearts (1210-K), Heart Air Balloon (9114-I) and Love is in the Air (9103-G).  I stamped the Heart Air Balloon onto a separate piece of white card stock, cut it out and then placed it on top of the Tumbling Hearts stamped image.
The paper used here is Echo Park along with Echo Park balloon sticker.

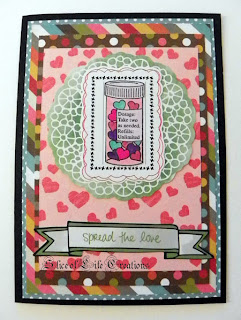
The next card here uses Repeat Impressions stamps.  This card is using BRIGHT colors and CRAZY patterned paper 


The stamps used here are the Tumbling Hearts (1210-K) and this little prescription bottle aptly named
 Prescription (8417-G).
The majority of the paper came from Simple Stories and Echo Park as did the stickers.

Last but certainly not least...I made a simple little birthday card...I am really trying to create a lot of birthday cards because I always need them. So here it is
The paper is American Crafts card stock and Bella BLVD from their Birthday Girl collection.  The stamp used is from Stampin' Up and the twine is from the Twinery.

I know that was a lot so thank you for bearing with me on this semi-long post.

The other day I started on a handmade paper wreath that I will post pictures of as soon as I complete it.  I want to have it up for Valentines Day.  I found the tutorial on YouTube and I hope that it turns out as pretty as I picture it to be.  

Thank you so much for stopping by and not forgetting about me.  I hope you have a wonderful day and are inspired to get out there and create something beautiful!!!
Photobucket